Sunday, July 7, 2013

Address data entered in HRMS not visible in the CRM Resource Manager

Issue:
When an employee is created in HRMS, address of the employee will be entered in the address button.
When the employee is imported as CRM Resource in CRM Resource Manager, address of the corresponding resource could not be seen in Miscellaneous tab
Solution:
To resolve the issue do the following
Step 1:
Navigation: Super HRMS Manager > People > Enter and Maintain > (B) Address
Ensure that "Primary" check box is enabled in address window of HRMS
Step 2:
Navigation: System Administrator > Profile > System
Set the following Profile Options
1) HZ: Protect HR Person Information = No
2) JTFRS: Hide Sensitive HR Data = No
The above profile option can be set either at Site level or at Responsibility level
Step 3:
Navigation: System Administrator > Application > Function. Query the function "JTFRSDEF". Go to Form tab and enter the below parameter and save
Pass the parameter "P_HIDE_SENSITIVE_HR_DATA=N" to the Define Resources form.
Now, go to Miscellaneous tab in CRM Resource Manager and view the address data.


Monday, October 1, 2012

Scheduling a Task that requires Skill

Can we schedule a Task that requires skill to carry out that task?
Yes.
How do we assign a Skill to a Resource?
Navigate to Field Service Manager à Field Service Dispatcher à Skill Management
Skill Management window opens. Go to Skill Levels. The User can see the seeded skills levels (Scales) that come along with Oracle Instance. If required, user can define their own skill level.
Go to Skills tab. Enter Skill Type Name, Description and Scales
Enter the Skill Name and Description and save
Go to Resources tab. Query for an employee to whom you want to assign the skill
Enter the Skill Type, Name and Level and save the record
How do we assign a Skill that is required for a Task?
Navigate to Field Service Manager à Field Service Dispatcher à Skill Assignment
Basic Find Tasks window opens. Search for the Task, for which skill is needed to carry out that task.
Skill Assignment windows opens. Assign the skill that is required to carry out this task and save.
How do we Schedule the task with Skilled Resource?
Navigate to Field Service Manager à Field Service Representative à My Service Requests à Find Service Requests
Go to the Task tab. Select the task that is to be scheduled. Click on the Scheduler Button that is near to the Assignee Field.
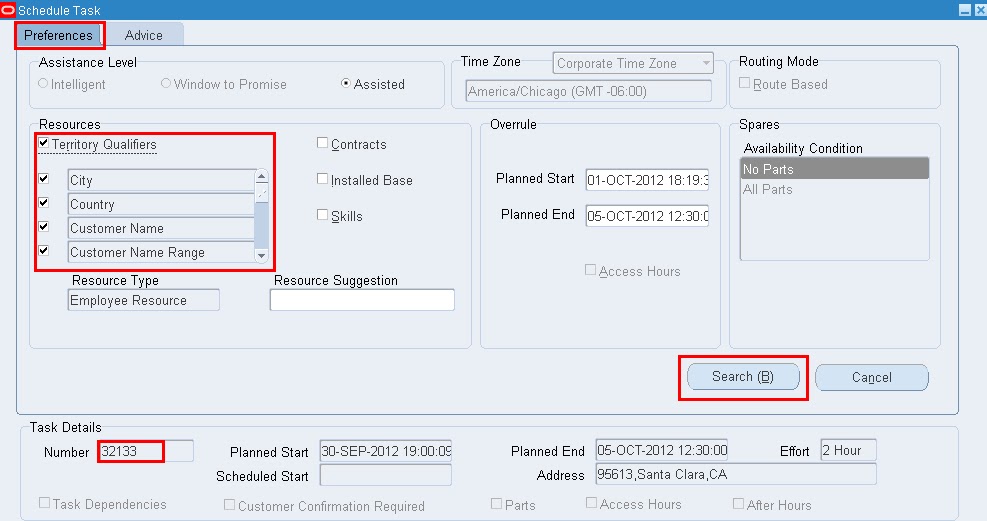
Schedule Task window opens. Select the Territory Qualifiers and Click on the Search button.
Advanced Scheduler will fetch all the optimized resource based on the Territory Qualifiers.
Now, go back to Preference tab, Select the Territory Qualifiers and Skills and Search.
Now, the Advanced Scheduler will fetch only the resource that comes under that territory with that specific skills required to carry out that task.
Cheers. Enjoy Learning Oracle Apps J

Sunday, September 30, 2012

Auto Generation of Field Service Task

Can we auto generate task when a service request is created?
Yes, using task template.
Create a task template and map that task template to a service request type. When user creates a service request using the mapped request type, tasks will be generated automatically while saving the service request.
How to create a Task Template?
Navigate to Field Service Manager à Field Service Setup à CRM Foundation à Task and Escalation Manager à  Tasks à Task Templates
Setup Task Template Groups window will opens.
Enter a Name and Description for the task template. Enter Application as Field Service and Document Type as Service Request
Enter the Subject Name, Task Type and the Task Status
Planned Effort will be defaulted based on the Profile Option setup.
Save the Record.
How to map a task template to Service Request Type?
Navigate to Field Service Manager à Field Service Dispatcher à Service Request à Setup à Mapping àTask Template Mapping
Task Template Mapping windows opens. Click on “Create Task Template Mapping Button”
Enter the Request Type for which the user wants to auto generate the tasks. Enter the Task Template which we created earlier and click on Apply.
Now, the user can see that the mapping of Task Template to a Service Request Type is done.
How do we verify that the Task Template is mapped to Service Request Type?
Navigate to Field Service Manager à Field Service Representative à My Service Request à Create Service Requests
Service Request window opens. Enter the request type which we mapped to the task template. Fill rest of the mandatory fields in the service requests window and save the request.
Now, the user can see that the tasks are generated based on the task template mapping.
Cheers. Enjoy Learning Oracle Apps J

Tuesday, June 5, 2012

Defining Service Request Type for Service Request

This tutorial will guide you to define a Request Type and Mapping it to the responsibility
Navigate to Field Service Manager >Field Service Setup > Service Request > Request Type
Enter the Type, Business Process, Status Group and Save.
If you want the Request Type to be available in Web, you can select Web Entry
Navigate to Field Service Manager >Field Service Dispatcher > Service Request > Setup > Mapping > Responsibility Mapping
Click Update button against the Responsibility
Click on Add Another Row button
Add the Request Type already created and Save
Navigate to Field Service Manager >Field Service Representative > My Service Request > Create Service Request
You can verify that the created Request Type will be listed in the LOV
Cheers. Enjoy Learning Oracle Apps J

Saturday, June 2, 2012

Defining Legal Entity in Oracle Apps

This tutorial will guide you to define a Legal Entity in Oracle R12 Apps
Navigate to General Ledger > Setup > Financials > Accounting Setup Manager > Accounting Setups
Go to Legal Entity tab, Click on Create Legal Entity button

Enter the Territory, Legal Entity Name, Organization Name, Legal Entity Identifier and PAN details.
Select Transacting Entity as Yes

Select Existing Address
Enter the Location already created in the Legal Address field
For creating Locations, refer Defining Locations in Oracle Apps
Enter Place of Registration and the Currency
Click Apply
Confirmation will be displayed with the message that Legal Entity is created successfully
Also, you can search for the Legal Entity created and it will display the result as below
Cheers. Enjoy Learning Oracle Apps J

Defining Business Group in Oracle Apps

This tutorial guides you to define the Business Group in Oracle R12 Apps
Navigate to Human Resources > Work Structures > Organization > Description
Find Organization window opens.
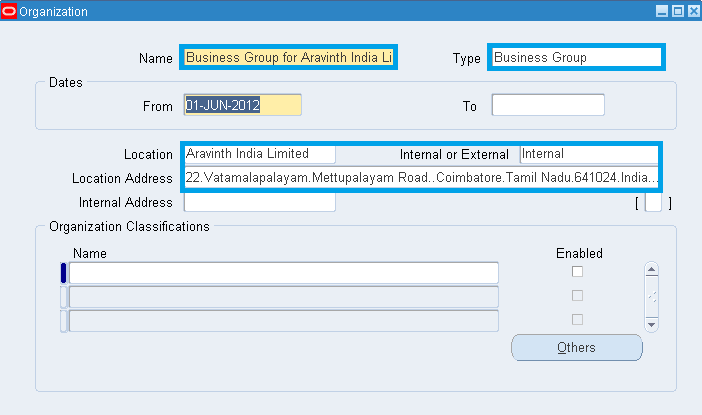
Click on New Button. Organization window opens
Enter the Name and Select the Type as Business Group
In the Location field, enter the Location created already and save the record
For creating Locations, refer Defining Location in Oracle Apps
Under the Organization Classifications, enter the name as Business Group and select the Enabled check box
Save the record
Click on Others Button
Additional Organization Information window opens, select Business Group Info and click OK
Enter all the details and click OK
Click Ok again and save the record
Cheers. Enjoy Learning Oracle Apps J

Defining Location in Oracle Apps

This tutorial guides you to define a Location in Oracle R12 Apps
Navigate to Human Resources > Work Structures > Location
Location window opens
Enter the Name and Description
In the Address tab, select Address Style as India or any Country
Location Address window opens
Enter the Address Details. Click OK and Save the Record
You can see that the address detail is populated in the field
Go to Shipping tab, select the site as per your need and save
Cheers. Enjoy Learning Oracle Apps J

Sunday, May 20, 2012

Creating Chart of Accounts in Oracle R12 Apps

In R12 Multi-org, Set of Books (SOB) is replaced by Ledgers and Ledgers will have 4Cs where as SOB had only 3Cs.
The 4Cs of Ledgers are
· Chart of Accounts (Accounting Flexfield Structure)
· Functional Currency
· Accounting Calendar
· Accounting Conventions (Not in SOB)
In this post, we are going to discuss how to create the Chart of Accounts.                                            
Creating a Chart of Accounts includes the below two steps
1) Create Accounting Structure
2) Enter Values to the Value Sets
Create Accounting Structure:
Navigate to System Administrator>Application>Flexfield>Key>Segments
Key Flexfield Segments window opens. Query Application as "General Ledger" and Flexfield Title as "Accounting Flexfield"
Enter a Name for the Code, Title and Description
Save the record
Click on Segments button
Segments Summary Windows Opens.
Enter the Number, Name, Window Prompt, and Column.
Keep the cursor in the Value Set field and Click on the Vale Set button
Value Set window opens.
Enter Value Set Name, Select the List Type, Security Type, Format Type and Validation Type
Enter the Maximum Size and Save the Record.
Close the Value Sets Window and go back to Segments Summary
Enter the created Value Set in the Value Set Field and Save the Record.
Now, Click on the Flexfield Qualifiers, Enable the Balancing Segment and Save the Record
Similarly, create the remaining segments with respectively created Value Sets.
For Department, select the Flexfield Qualifiers as Cost Center Segment and
For Account, select the Flexfield Qualifiers as Natural Account Segment
Save the record.
Close the Segments Summary window and go back to Key Flexfield Segments Window
Select the Freeze Flexfield Definition check box.
Caution Window opens. Click OK
Click on Compile Button to save the record.
Click OK. Note is displayed with the message that the flexfield was compiled successfully. Click OK and close the window
Enter Values to the Value Sets
Navigate to System Administrator>Application>Flexfield>Key>Values
Enter the Application Name as General Ledger
Title as Accounting Flexfield
Enter the Accounting Structure created in the Structure Field. Click on the Find button
Segment Values window opens
Go to Values, Effective tab and enter the Values for the Segment ‘Company’
Go to Values, Hierarchy, Qualifiers tab, click on Qualifiers field and select the Segment Qualifiers
Save the record
Keep the cursor in the Independent Segment Field and click on the Clear tool in the tools menu. Window with next Value Set (Department) opens.
Enter the values and segments qualifiers and save the record
Similar way, enter the values and segment qualifiers for Account
Similar way, enter the values and segment qualifiers for Product
Now, we done with creating the Chart of Accounts
Cheers. Enjoy Learning Oracle Apps J