Showing posts with label Oracle Apps Basics. Show all posts

Saturday, June 2, 2012

Defining Legal Entity in Oracle Apps

This tutorial will guide you to define a Legal Entity in Oracle R12 Apps
Navigate to General Ledger > Setup > Financials > Accounting Setup Manager > Accounting Setups
Go to Legal Entity tab, Click on Create Legal Entity button

Enter the Territory, Legal Entity Name, Organization Name, Legal Entity Identifier and PAN details.
Select Transacting Entity as Yes

Select Existing Address
Enter the Location already created in the Legal Address field
For creating Locations, refer Defining Locations in Oracle Apps
Enter Place of Registration and the Currency
Click Apply
Confirmation will be displayed with the message that Legal Entity is created successfully
Also, you can search for the Legal Entity created and it will display the result as below
Cheers. Enjoy Learning Oracle Apps J

Defining Business Group in Oracle Apps

This tutorial guides you to define the Business Group in Oracle R12 Apps
Navigate to Human Resources > Work Structures > Organization > Description
Find Organization window opens.
Click on New Button. Organization window opens
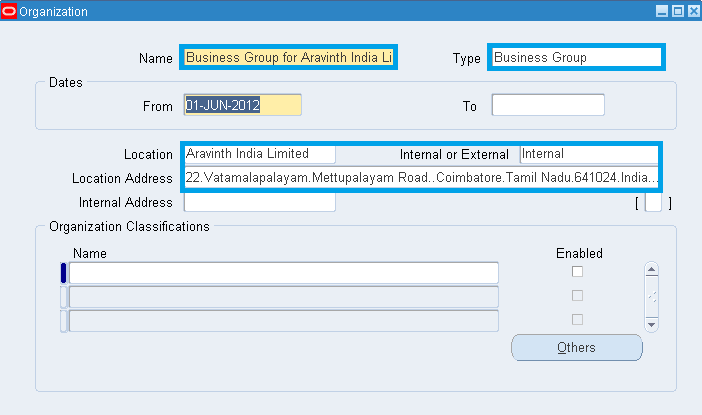
Enter the Name and Select the Type as Business Group
In the Location field, enter the Location created already and save the record
For creating Locations, refer Defining Location in Oracle Apps
Under the Organization Classifications, enter the name as Business Group and select the Enabled check box
Save the record
Click on Others Button
Additional Organization Information window opens, select Business Group Info and click OK
Enter all the details and click OK
Click Ok again and save the record
Cheers. Enjoy Learning Oracle Apps J

Defining Location in Oracle Apps

This tutorial guides you to define a Location in Oracle R12 Apps
Navigate to Human Resources > Work Structures > Location
Location window opens
Enter the Name and Description
In the Address tab, select Address Style as India or any Country
Location Address window opens
Enter the Address Details. Click OK and Save the Record
You can see that the address detail is populated in the field
Go to Shipping tab, select the site as per your need and save
Cheers. Enjoy Learning Oracle Apps J

Sunday, May 20, 2012

Creating Chart of Accounts in Oracle R12 Apps

In R12 Multi-org, Set of Books (SOB) is replaced by Ledgers and Ledgers will have 4Cs where as SOB had only 3Cs.
The 4Cs of Ledgers are
· Chart of Accounts (Accounting Flexfield Structure)
· Functional Currency
· Accounting Calendar
· Accounting Conventions (Not in SOB)
In this post, we are going to discuss how to create the Chart of Accounts.                                            
Creating a Chart of Accounts includes the below two steps
1) Create Accounting Structure
2) Enter Values to the Value Sets
Create Accounting Structure:
Navigate to System Administrator>Application>Flexfield>Key>Segments
Key Flexfield Segments window opens. Query Application as "General Ledger" and Flexfield Title as "Accounting Flexfield"
Enter a Name for the Code, Title and Description
Save the record
Click on Segments button
Segments Summary Windows Opens.
Enter the Number, Name, Window Prompt, and Column.
Keep the cursor in the Value Set field and Click on the Vale Set button
Value Set window opens.
Enter Value Set Name, Select the List Type, Security Type, Format Type and Validation Type
Enter the Maximum Size and Save the Record.
Close the Value Sets Window and go back to Segments Summary
Enter the created Value Set in the Value Set Field and Save the Record.
Now, Click on the Flexfield Qualifiers, Enable the Balancing Segment and Save the Record
Similarly, create the remaining segments with respectively created Value Sets.
For Department, select the Flexfield Qualifiers as Cost Center Segment and
For Account, select the Flexfield Qualifiers as Natural Account Segment
Save the record.
Close the Segments Summary window and go back to Key Flexfield Segments Window
Select the Freeze Flexfield Definition check box.
Caution Window opens. Click OK
Click on Compile Button to save the record.
Click OK. Note is displayed with the message that the flexfield was compiled successfully. Click OK and close the window
Enter Values to the Value Sets
Navigate to System Administrator>Application>Flexfield>Key>Values
Enter the Application Name as General Ledger
Title as Accounting Flexfield
Enter the Accounting Structure created in the Structure Field. Click on the Find button
Segment Values window opens
Go to Values, Effective tab and enter the Values for the Segment ‘Company’
Go to Values, Hierarchy, Qualifiers tab, click on Qualifiers field and select the Segment Qualifiers
Save the record
Keep the cursor in the Independent Segment Field and click on the Clear tool in the tools menu. Window with next Value Set (Department) opens.
Enter the values and segments qualifiers and save the record
Similar way, enter the values and segment qualifiers for Account
Similar way, enter the values and segment qualifiers for Product
Now, we done with creating the Chart of Accounts
Cheers. Enjoy Learning Oracle Apps J

Wednesday, August 3, 2011

Defining Context-Sensitive Segment for Descriptive Flexfield (DFF)

I’ve already blogged posts on creating Global Segments for DFF with Validation type independent and Dependant
Here, I will be discussing in detail on how to create Context-Sensitive Segments for Descriptive Flexfield.
Navigate to System Administrator Responsibility à Applications à Flexfield à Descriptive à Segments
Query the DFF “Additional Information for Agents”
In the Prompt Field enter as “Component Received”. See that the Check boxes “Required” and “Enabled” are checked.
Now, keep the cursor in the second line of the Context Field Values and Type Code as NO and provide a description
Same way enter as YES in the next line and Keep the cursor on the YES line and Click the Segments Button.
Segments Summary Window Opens. Enter Name as Inspection Status and Assign Column Attribute.
Click on Value Set Button, Value Set window opens. Type the Value Set Name, Security Type, Maximum Size and Validation Type. Save and Close the Record.
Now, Click on Open Button in the Segments Summary window. Segments window opens. Type the Description and Check the Security Enables check box. Save and close the window.
Assign the Value Set “Component Received” we have created already. Save and Close.
Check the Freeze the Flexfield check box and compile the changes.
Now, Navigate to System Administrator Responsibility à Application à Validation à Values. Find Value Set window opens. Enter the Value Set Name we have already created and click find.
Enter the Values as Accepted, Rejected and Under Inspection line by line and Save.
Now, go to the Service Request screen and check the DFF. If we select the Component Received as NO, no further fields will be visible.
If we select the Component Received as YES, it will ask for the Inspection Status.
So, this is how we will be creating context-sensitive segments for a Descriptive Flexfield.

Tuesday, August 2, 2011

Value Sets in Oracle Applications

Value Sets are a Set or List of Values (LOV) that are usually predefined and are used in Flexfields and concurrent programs. Value sets can be said as container of values.
A value set is used in Oracle Applications to restrict the values entered by a user. The values can be of any data type (Char, Number etc.)
Here, I’m explaining about defining value sets for the Descriptive Flexfield (DFF) which is enabled for Service Request Screen.
For Enabling DFF refer my post 
Descriptive Flexfield in Oracle Apps
Navigate to System Administrator Responsibility à Application à Validation à Set à Value Sets Window opens 
Type a Value Set Name, Description, Select List Type, Security Type, Format Type, Maximum Size, etc
I’m going to explain only about Independent and Dependant Validation Type here. For Creating a Value Set with validation type as Dependant, initially we have to create a Value Set with validation type as Independant.
Select Validation Type as Independent and Save.
Now, Navigate to System Administrator Responsibility à Application à Validation à Values à Find value Set window opens
Enter the Value Set Name we have created already in the Name field and click Find.
Segment Value window opens. In the Values, Effective tab, enter the values you wanted to include in Value Sets and save.
Now, Navigate to System Administrator Responsibility à Application à Validation à Set à Value Sets Window opens. Type the Value Set Name, etc and select the Validation Types as Dependant.
Now, Click on the Edit Information button. Dependant Value Set Information window opens. Select the Value Set Name we have created with validation type Independant. Enter dependant default values as None and Save. 
Now, Navigate back to Value Set Screen and Save the record.
Navigate to System Administrator Responsibility à Application à Validation à Values à Find value Set window opens. Enter the Value Set Name and Independant Value as India and Click Find.
Segment Values window opens. Enter the Values as required in the Values, Effective tab and Save. The same way you have to query for other 2 locations and enter the values and save.
Navigate to System Administrator Responsibility à Applications à Flexfield à Descriptive à Segments
Query the DFF and click Segments.
Segment Summary window opens. Enter the Segment Name and assign the Value Set Country_Locations to it. Now, Click open Button. Segments window opens. Type the Description and Check the Security enabled check box and Save. 
Same way do it for next segment and Save.
Navigate back to Descriptive Flexfield Segments, Check the Freeze Flexfield Definition check box and Compile the record.
Now, Navigate back to Service Request Screen and click on the DFF [ ]. You can see the List of Values.
Please note, if you select the Country as INDIA, States defined in the Value Sets INDIA will only be displayed.