Showing posts with label Oracle Purchasing. Show all posts

Tuesday, November 22, 2011

Sourcing Rule in Oracle Purchasing

Sourcing rules determine the movement of materials between organizations in a global enterprise; these organizations include the suppliers and the materials include those items made at the manufacturing organizations.
Sourcing rule can be global (available to all organizations) or local (available to the only organization in which it is defined)
Replenishment source can be:
1) An inter-organization transfer (Transfer From)
2) The replenished organization that manufactures the item (Make At)
3) An external supplier (Buy From)
Make at:
This option specifies that you will make any items associated with the rule at the receiving organization.
Buy From:
This option specifies that you will buy any items associated with the rule from supplier. You must enter appropriate supplier and site (optional).
Transfer from:
This option specifies a diff organization within the enterprise as the source of the items. Using this option you will identify the source organization. You must have already defined the shipping network between source and receiving organization.
Ship method
Ship Method determines the Intransit time and shipping cost which planning will use in its calculations.
Allocation and Rank in Sourcing rule
You can rank the sources of supply named in the rules and bills, giving one priority over another when the planning process generates recommendations. You can also assign sourcing percentages to these sources, allowing you to allocate a portion of the total orders to each source. You cannot apply sourcing rules and bills of distribution (make them Planning Active) until the sum of the allocation percentages equals 100.
Once you have defined your sourcing rules and bills of distribution, you must assign them to particular items and/or organizations.
Each Sourcing rule can be assigned to:
A single item (across all organizations)
An item in a specific organization
All items in a specific organization
A category of items
A category of items in an organization
All items in all organizations (globally)
Here, I’ll discuss how to create sourcing rule and assigning it to an item.
1) Verify Profile Options
Navigate to System Administrator à Profile à Personal Profile
Verify the following Profile Options
MRP:Default Sourcing Assignment Set: Supplier Scheduling
PO: Automatic Document Sourcing: Yes
PO: Allow Auto-generate Sourcing Rules: CREATE AND UPDATE
PO: Allow Autocreation of Oracle Sourcing Documents: Yes
2) Create a Item in Inventory with Purchasing Item Template

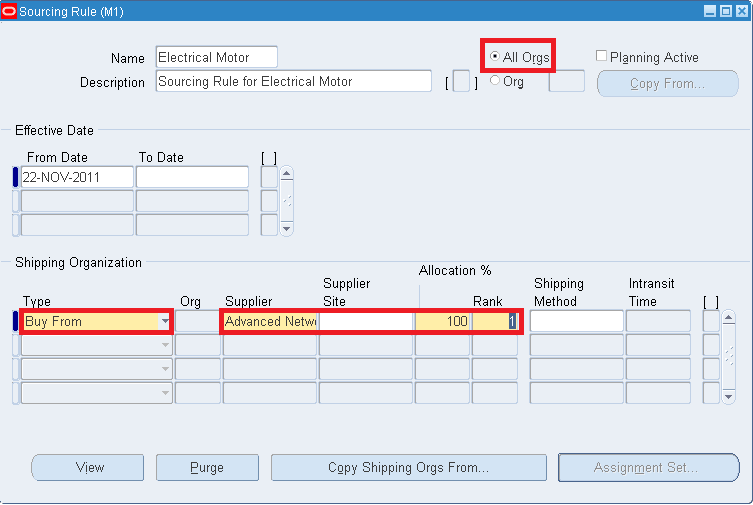
3) Create Sourcing Rule
Navigate to Purchasing à Supply Base à Sourcing Rules
Enter the Name, Effective Date
Select All Orgs
Select Type as Buy From
Enter Supplier Name, Allocation % and Rank
Save
4) Assigning Sourcing Rule
Navigate to Supply Base à Assign Sourcing Rule
Go to Menu à View à Find
Choose Supplier Scheduling from the list of values.
Add a new line with the item created and Assign the Sourcing Rule to the Item

5) Verify Sourcing Rule
Now, Navigate to Requisitions à Requisitions
Verify that the Sourcing Rule is defaulted on creation of the requisition for that particular item.

Enjoy Learning Oracle Apps J

Monday, August 29, 2011

Business Flow of Drop Ship Order

Drop Shipment is a process where the customer places an order on a company and the company instructs its supplier to directly ship the items to the customer.
Item creation for Drop Ship Orders
Enter the Item Name and Description.
Go to Tools à Copy From: Purchased Template. Click Apply and done
In the Order Management tab, select the Check boxes Customer Ordered, Customer Orders Enabled, Shippable, and OE Transactable.
Default SO Source Type as External.
Assign the Item to Inventory Organization

Add the Item to the Price List

Create a Sales Order
Go to Order Management Super User à Orders, Returns, Sales Order
Create a Sales Order with type Mixed and with the item created for Drop Ship Order.
Make Sure in the Shipping tab Source Type as External.

Once you save the Order the Order Line Status will be in Entered.

Now Book the Order. Order Line Status will be Booked.

Run the Workflow Background Process
Go to Purchasing à Reports/Run à Workflow Background Process
Item Type: OM Order Line
Process Deferred: Yes
Process Timeout: Yes

Make sure the request is completed Normal

Now, the Order Line Status will be Awaiting Receipt

Run Import Requisition Request
Navigate to Purchasing à Reports / Run à Requisition Import
Import Source: Order Entry

Open the request once the request is completed successfully.

Now, navigate to Order Management à Orders, Returns à Order Organizer
Enter the Sales Order Number and click Find.
Place the cursor on the Line tab, right click and go to Additional Line Information à Drop Ship
The Drop ship tab will show the Purchase Requisition Number with Approved status.
Copy the Purchase Requisition Number
Auto Create Purchase Order
Go to Purchasing à Auto Create
Clear the entire field and enter the copied Requisition Number and click Find. Auto Create Document window opens. Click the Automatic Button. New Document window opens. Enter the Supplier Name and Site and click Create.

Auto Create Purchase Order Window Opens with Purchase Order Created with Status Incomplete.
Click the Approve button and submit the PO for Approval.
Approve Purchase Order
Go to Purchasing à Purchase Order à Purchase Order Summary.
Enter the PO number and verify whether the PO is approved.

Receiving the Receipts
Go to Purchasing à Receiving à Receipts
Enter the PO Number and Click Find. Receipts window opens. Check the box in left side. Enter the Quantity received and Subinventory as Drop Ship. Save the Receipt.

Now, the Order Line Status will be Shipped and the Additional Line Information will show the PO Shipment as 1


Run Workflow Background Process
Go to Purchasing à Reports/Run à Workflow Background Process
Item Type: OM Order Line
Process Deferred: Yes
Process Timeout: Yes
Make sure the request is completed Normal
Now, the Order Line Status will be Closed

Mandatory Setups for Internal Sales Order (ISO)

Create Item in Master Items
Navigate to Inventory à Items à Master Items
Select organization V1 (Vision Operations)
Enter Item Name and Description
Go to Tools à Copy From: Apply the 'Purchased Item' template

Go to the Order Management tab and select the checkbox for Internal Ordered and Internal Orders Enabled

Save the record
Assign the Item to both Source and Destination Organization
Go to Tools à Organization Assignment à Check M1 and D1

Save the record
Setup Shipping Network between Inventory Organizations
Navigate to Inventory à Setup à Organizations à Shipping Networks
Click on Find

Verify the following or make changes where needed.
Transfer Type: Intransit
FOB: Receipt
Receipt Routing: Standard
Internal Order Required: checked
Define Inter-Location Transit Time
Navigate to Inventory à Setup à Organizations à Inter-Location Transit Times
Click F11 and Ctrl F11 to query.

Origin Type: Internal Location
Origin: M1- Seattle Mfg
Destination Type: Internal Location
Destination: D1- Singapore
Enter the Ship Method and Intransit Time as below:
Ship Method: Air Freight
Intransit Time: 4
Check the Default Method check Box.
Open Inventory Accounting Periods
Navigate to Inventory à Accounting Close Cycle à Inventory Accounting Periods

Verify if the Sysdate is in an Open accounting period; else open the same by clicking on the button Change Status, and clicking ok to the question "Open this Period?"
Create On-hand for Item in Source Inventory Organization
Navigate to Inventory à Transactions à Miscellaneous Transaction
Create a miscellaneous receipt transaction with the following information
Item: Enter the Item created
Subinventory: FGI    
UOM: Ea    
Quantity: 1000
Account: Select the account alias Miscellaneous (01-580-7740-0000-000)

Save record
Verify the On-Hand Availability
Navigate to Inventory à On-hand Availability à On-hand Quantity

Verify the on-hand quantity for the item
Define Transaction Type and Order Source in Purchasing setup
Navigate to Purchasing à Setup à Organizations à Purchasing Options
Notice the following and confirm
Internal Requisition Order Type: Mixed
Internal Requisition Order Source: Internal

Define Inter-Location Transit Time
Navigate to Inventory à Setup à Organizations à Intercompany Transaction Flows
Click on Intercompany Relation and verify the details as below

Once you are done with the above setups, you can create Internal Sales Order for the Item created and transacted between the two organizations.

Business Flow of Internal Sales Order (ISO)

Create Internal Requisition
Navigation: Purchasing à Requisitions à Requisitions
Select Type to Internal Requisition
Click into the Lines Region on the Item field then Enter Item with Quantity
Enter Destination Inventory Organization: Seattle Manufacturing
Location: M1- Seattle Mfg
Source: Inventory
Organization: Vision

Click the Distributions Button and enter the Charge Account and Save.

Note down the Internal Requisition Number. Click Approve the Requisition.

Make sure that the Requisition is approved.

Create Internal Orders
Navigation: Purchasing à Reports/Run
Submit the request - 'Create Internal Orders'

Make sure that the Request completed Normal.

Import the Internal Sales Order
Navigation: Order Management Super User àOrders, Returns à Import Orders à Order Import Request
Source: Internal
Order Reference: Requisition Number created before.

Submit the request and confirm it completes with success

Verify Import of Internal Sales Order
Navigation: Order Management Super User à Orders, Returns à Order Organizer
Source Type: Internal
Requisition number: Requisition Number created before

Click Find. Sales Order will be displayed confirming that the order was imported.

Pick Release the Internal Sales Order
Navigation: Order Management Super User à Shipping à Release Sales Order
Enter the Internal Sales Order number
In the Inventory tab, select the source inventory organization
In the Shipping tab, select Yes for Autocreate Delivery and Auto Pick Confirm
Click Execute now and Confirm the Pick Release process has completed with success

Ship Confirm the Internal Sales Order
Navigation: Order Management Super User à Shipping à Transactions
Enter the Internal Sales Order in the field 'From Order Number' and 'To Order Number'. Click Find
Now, go to the Delivery tab and click Ship Confirm.
Confirmation message will be displayed.

Verify the receipt of Item in Inventory
Navigation: Purchasing à Receiving à Receiving Transactions Summary
Select the Destination Inventory Organization
Select the Source to Internal
Enter the Item Number
Select Transactions and click Find

Create Intercompany AR Invoice
Navigation: Inventory à Reports/Run
Submit the request - 'Create Intercompany AR Invoice'

Run AutoInvoice (If not setup Automatic)
Navigation: AR à Interfaces à AutoInvoice

Create Intercompany AP Invoice
Navigation: Inventory à Reports/Run
Submit the request - 'Create Intercompany AP Invoice'

Run 'Payable Open Interface Import'.
This completes the steps for the internal order flow.