Showing posts with label Oracle Order Management. Show all posts

Monday, December 26, 2011

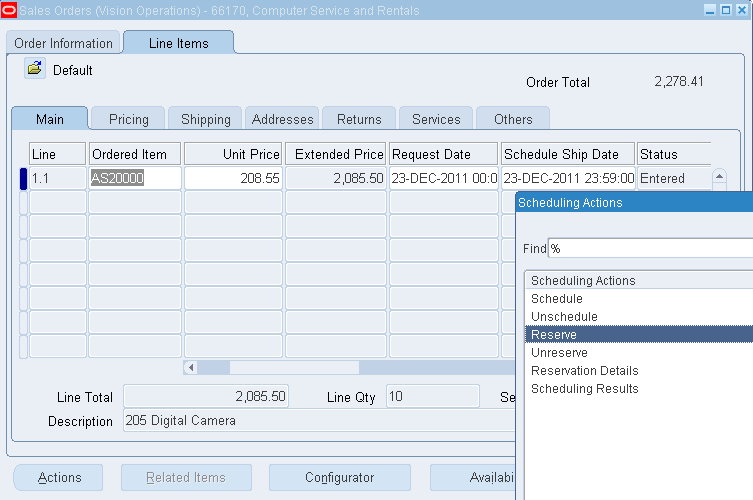
Various Ways to Schedule Sales Order in Oracle Apps

Here, I will discuss the various ways through which we can Schedule the Sales Order
1. OM Profile Option OM: AutoSchedule

2. From Tools Menu of the Sales Order Window

3. Order Management Transaction Type Setup

4. Sales Order line

5. Schedule Order Concurrent Program

In Order Management, we have 3 types of Scheduling Sub-Process for an Order line.
Schedule – Line (Scheduling happens automatically as soon as we book the Order)
Schedule – Line, Manual (We have to Schedule the Order Manually)
Schedule – Line, Deferred
Enjoy learning Oracle Apps J

Tuesday, November 22, 2011

Processing Constraints in Oracle Order Management

Processing Constraints are a security framework where you can define rules in Oracle Order Management that validate back-end operations such as Create, Update, Delete and Cancel.
Examples:
You cannot change the Order Type in the order header once the order is Booked.
You cannot delete the line in an order once the Order Status is Closed (if the order is ship confirmed or invoice interfaced).
Here, I’ve explained about Processing Constraints with an example.
Navigate to Order Management à Setup à Rules à Security à Processing Constraints
Query the Application as Order Management
Create a New Line on the Constraints region:
Operation = Update
Attribute = Order Type
User Action = Not Allowed
Enabled check box = Selected
Create a New Line on Conditions tab:
Group Number = 101
Scope = Any
Validation Entity = Order Header
Record Set = Order
Validation Template = Booked
Enabled check box = Selected
User Message = Order is Booked

Create another New Line on Conditions tab:
Group Number = 102
Scope = Any
Validation Entity = Order Header
Record Set = Order
Validation Template = Lines Exist
Enabled check box = Selected
User Message = Order has Lines

Navigate to Order, Returns à Sales Order
Create a Sales Order with Order Type as Mixed
Enter the Item Number and Save the Record (i.e., the order will be in Entered Stage)

Now, you try to change the Order Type. It will give you the error that "You are not allowed to update the Order Type because: Lines exist for this Order".

Now, Book the Order and try to change the Order Type. 

It will give you the error that "You are not allowed to update the Order Type because: Order is Booked"

Enjoy Learning Oracle Apps J

Friday, November 11, 2011

Scheduling Sales Order in Order Management

In this blog, I will discuss how to schedule a Sales Order
Navigate to System Administrator Responsibility > Security > Profile > Personal
Set the profile option: OM: Auto Schedule = No

Navigate to Order Management Super User à Setup à System Parameters à Values
Reservation Time Fence = 30 (Time in days)
If the schedule date falls within the Reservation Time Fence, item will be reserved at the time of scheduling itself.

Navigate to Order Management Super User à Order, Returns àSales Order
Enter the Customer Name, Order Type and Price List

Go to Lines tab and enter Ordered Item, Qty and Request Date
See to that the Request Date should be greater than the Reservation Time Fence Value (in my case I've set the Date as Today's Date + 43 Days)

Click the Availability button to view whether the quantity is available. If the available quantity is sufficient, you can continue to the scheduling task.

Go to Tools menu, select Scheduling à Schedule. Click OK.

Go to Shipping tab and notice that the schedule ship date has been set to the request date.

Go to Tools menu, select Scheduling à Reserve. Click OK.

On the Shipping tab, you can view the reserved quantity in the Qty Reserved field.

Save the record.

Auto Scheduling Sale order
If Auto Schedule Option in the Tools Menu is Enabled, the Item will be Reserved automatically once the line is saved.

You can see that the Item is Reserved automatically

Enjoy learning Oracle Apps J

Articles related to this post

Thursday, November 10, 2011

Creating and Progressing Sales Order for ATO Configuration Item

Navigate to Order Management Super User Responsibility > Orders, Returns > Sales Orders
Enter the following in the sales orders window:
Enter the Customer Name, Order Type and Sales Person.

In the Order Lines region, enter the ATO Model in the Ordered Items field and enter the quantity. Click Configurator button.

Separate window opens showing the Configurator and select the classes that should be a part of the ATO model. Use the Select box to choose the classes. Click Finish.
Configurator processes the classes that you have selected to display on the sales order window. You will get a message indicating that the Configurator processing is in process. Once the processing is complete, the sales orders window shows the ATO Model information.

Now, Book the order.

Keep the cursor on the ATO Model Line and right click and then click on Progress Order (Configure Item will be inserted to OE_ORDER_LINES_ALL table). 

Click on Create Configuration - Eligible

Configuration Star Item will be created on the second line. 

Now, keep the cursor on the Configuration Star Item Line and right click and then click on Progress Order.

Click on Create Configuration - Eligible 

This runs a Concurrent program that will push the data from Order Management (OM) to Work in Process (WIP)

Open the output of the Concurrent program and note down the WIP Job ID.

Navigate to WIP > Discrete Jobs and query for Job ID.

Change the Status from Unreleased to Released and Save.

Navigate to Completion Transactions window and enter the Job Number and see that Type is WIP Completion and click Continue.

Enter the Subinventory and quantity and select the Check Box Final Completion and click Done. This will complete the Job.

Now, you can see that the status of the Configuration item will be Awaiting Shipping.

Now, you can Pick Release and Ship Confirm the Order as like normal sales order.

Articles related to this post

Creating ATO Configuration Item in Oracle Apps

Create an ATO Configuration    
Navigate to Inventory à Items à Master Items
Enter the item name and description:
Go to Tools in the Menu à Copy From the Template: ATO Model and click Apply and Save.

Now, go to Tools in the Menu à Organization Assignment. Assign the item to Organization you want to transact and Save.

Now, Create ATO Option Class by applying ATO Option Class template and assign it to Organization

Now, Create ATO Option Item and assign it to Organization.

Create Bills of Materials

Navigate to Bills à Bills
Create a bill of material for the Option Class and then for Model.
Start with the sub-class or the lowest class in the hierarchy so that once it is created it can be included in the top models or classes.
The field Item is the item name as well as the BOM name.

Ensure that the Item Seq is in the order you want the items included in the Bill of Material. Enter all quantities as appropriate.
Click the tab Order Management to enter if the item is optional or Mutually Exclusive for the bill or not. Please not included items are not optional.
Go to Tools in the Menu à Create Common Bill concurrent program.

Select All Organizations button so that the Bill of Material is available across all inventory organizations.
Go View in the Menu à Requests option to view the completion of the Bill of Material.

Repeat the same steps for creating a Bill of Material for the remaining Items

Run the Create Common Bill for ATO Model

Enter Quantities for the items
Use the Miscellaneous Receipts window to create quantities for the items. You need to enter quantities only for finished goods.
Navigate to Inventory à Transactions à Miscellaneous Receipts
Select Miscellaneous Receipt from the Type LOV. Click Transaction Lines to view the Type LOV.
The Miscellaneous Receipt window opens so that you can specify the Subinventory, account and quantity for the item.

Save and exit once you have completed entering the quantity for the items.
Now, you'll be able to book sales Order for the ATO Model you have created.

Articles related to this post 

Monday, November 7, 2011

Values have not been entered for one or more required segments

Error:
"Values have not been entered for one or more required segments" while creating a sales order"

Solution:
Enter the suitable value for Required Field in Descriptive Flexfield or make the field "Not Required" in the Descriptive Flexfield (DFF) or disable the DFF.